Quantcast
Viewing all 206 articles
Browse latest View live

New Options for Administrative Notifications

Aladtec has enhanced notifications, giving administrators greater flexibility in which notifications they receive for other members' requests. With this added flexibility, administrators can better focus on the administrative notifications they really need.

For example:
  • Shift commanders can limit notifications to requests from members on a specific shift, e.g. Shift A.
  • Time Off administrators can receive notifications for just time off.
  • Managers can monitor notifications for groups, like trainees, regardless of which schedule the request may effect.


An administrator must have schedule authority to be notified of other members' requests. Administrative notifications are set up via the My Info page.


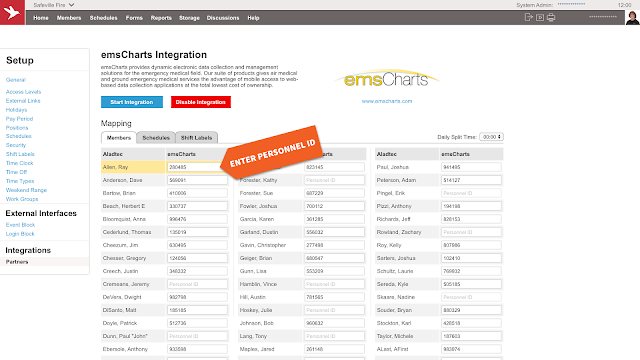
Administrative notifications will be sent for specific requests based on groups of members, i.e. Access Levels or Work Groups. Keep in mind, this does not necessarily mean an administrator will receive all requests generated by a particular group, because the administrator must also have Schedule Authority over the request.


Administrators can choose to receive administrative notifications for Sign-Ups, Time Off, and Trade requests as an email, text, or as both email and text.


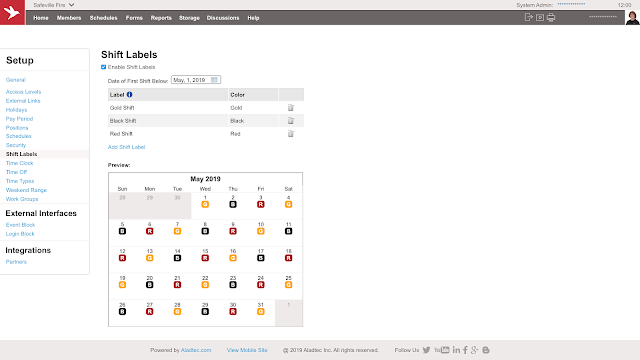
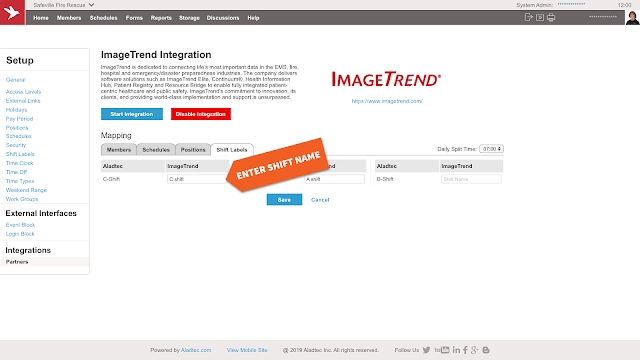
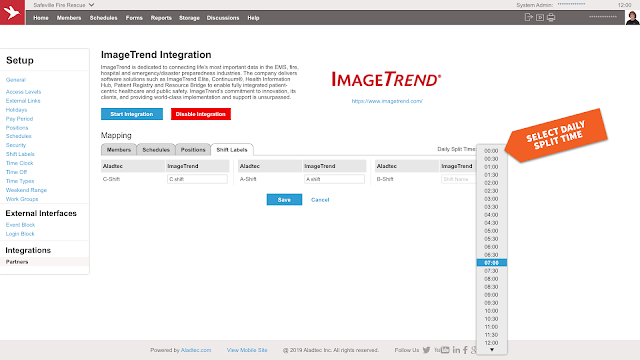
In the example below, the administrator has chosen to receive administrative notifications for Sign-Ups and Trades based on two Access Levels, but only receive administrative notifications for Time Off based on one Access Level. This allows the administrator to receive the proper administrative notifications needed to manage the schedule and to receive only the Time Off administrative notifications they need.
Image may be NSFW.
Clik here to view.


For additional detail on how to set up administrative notifications, watch this video.

For questions or additional help with administrative notifications, please contact the Support Team at support@aladtec.com or 888.749.5550. As always, thank you for using Aladtec!

~ Your Aladtec Team

Get the Most Out of Your Aladtec System

Aladtec encourages customers to take advantage of a free system optimization at least once a year. Over time, not only do the needs of a customer change, due to policy or organizational changes, but the Aladtec system is continually enhanced.

A system optimization is a great time to:
  • identify process improvements, such as replacing paper forms with electronic forms; forms in Aladtec can be submitted from anywhere via Mobile.
  • review Aladtec features, such as Minimum Staffing to quickly identify schedules missing qualified members.
  • understand any new policy changes which may have impacted current configurations such as work limit rules, overtime, trades, or time off.
To schedule a free system optimization for your Aladtec system, please contact the Aladtec Support Team at 888.749.5550 or support@aladtec.com. As always, thank you for using Aladtec!

~Your Aladtec Team

Enforce Strong Passwords

Password security can be improved by enforcing strong passwords for all members in the Aladtec system. When strong passwords are enforced, the Aladtec system requires each member to create a password using a combination of uppercase and lowercase letters, numbers, and symbols, making it more difficult for a security breach to occur.

To enforce the use of strong passwords in the Aladtec system, select the service name in the upper left of the Aladtec system, then choose Setup. Within Setup, select Security and update the Enforce strong passwords setting, as shown below. When a password is updated, the member will be required to use a strong password.


If you have any questions or would like assistance in enforcing strong passwords in your system, please contact the Support Team at 888.749.5550 or support@aladtec.com. As always, thank you for using Aladtec!

~Your Aladtec Team

Switch Between Aladtec Systems


Aladtec members who work for numerous services may have access to multiple Aladtec systems. These systems can be linked together, allowing the member to easily switch between the Aladtec systems without having to log in to each system.

To switch between Aladtec systems, contact Aladtec Support to link the systems together. After the systems are linked, to switch systems, simply log into one Aladtec system, select the service name in the upper left of the system, and then choose a system. In the example below, a member logged in to one Aladtec system and has the option to switch to two other Aladtec systems.


If you have any questions or would like to switch between Aladtec systems, please contact the Support Team at 888.749.5550 or support@aladtec.com. As always, thank you for using Aladtec!

~Your Aladtec Team

Modify Existing Repeats and Rotations

Existing Repeats and Rotations can be modified to end early or to extend out further. These modifications are needed when:
  • a member needs to be moved to a different rotation, schedule, or position.
  • a member’s current rotation is ending and the member will continue working the same rotation.
  • a member is on an indefinite leave of absence.

It’s easy to shorten or extend an existing Repeats and Rotations. In the example below, the member’s existing rotation can be shortened or extended by modifying the rotation found under Previous Rotations.

After selecting to modify the rotation, simply update the date/time then select Continue (see example below). Be careful not to delete the rotation because the rotation and its history will be permanently deleted. If the rotation is being extended and there are any conflicts, a warning will be provided with additional information about the conflicts.


To learn more about modifying Repeats and Rotations, click on the video below.


If you have questions or need assistance with Repeats and Rotations, please contact the Support Team at 888.749.5550 or support@aladtec.com. As always, thank you for using Aladtec!

~Your Aladtec Team

Extra Hours - Easily Track Unplanned Hours

Aladtec has a new feature, Extra Hours, streamlining the workflow for tracking unplanned hours. Unplanned hours may happen in situations such as: holdovers, shift variances, shift adjustments, unscheduled overtime, and missed sign ups. Members request Extra Hours, which are approved by administrators, and viewed on schedule views and reports.

To enable Extra Hours, in Setup, modify Access Levels and Work Groups. Access Levels control who is allowed to view Extra Hours in Schedule Views. Work Groups control who is allowed to submit Extra Hours requests. In Work Groups, shown below, administrative approval of Extra Hours requests is optional and Extra Hours are automatically included in Work Limits.

Click to enlarge

Members can submit Extra Hours requests from My Schedule. Extra Hours can only be submitted for time in the past which is within the system’s Historical Edit Limits (adjustable in Setup - General). A member cannot request Extra Hours overlapping their Scheduled Time or Time Off. Below is an example of an Extra Hours request submitted via mobile.

 Image may be NSFW.
Clik here to view.


                                                                                            Click each to enlarge

Notifications will be sent for Extra Hours requests based a member’s My Info - Notifications settings. An example of an administrator’s My Info page is shown below.

Click to enlarge


Pending Extra Hours requests can be processed, depending on Access Levels, via the Dashboard, Schedule Views, My Schedule, Hourly Editor, and Change Requests. While processing an Extra Hours request, an administrator can approve or deny the request, modify the Time Type, and add notes, as shown below.

Click to enlarge


Approved Extra Hours are viewable, depending on Access Levels, in all the same places Additional Schedules (e.g. Time Off, Trades, etc.) are viewable. Below is an example of an approved Extra Hours request on the Monthly Calendar view.

Click to enlarge


The Hourly Editor calculator can include Extra Hours when calculating total hours for members. Excluding a Time Type in the Hourly Editor calculator will exclude both Scheduled Time and Extra Hours with that Time Type. See Hourly Editor example below.

Click to enlarge


Forms used for timesheets can incorporate Extra Hours. In the Form Configurator, simply update the Form’s Pay Period Time Records settings to include Extra Hours, as shown below. Like scheduled time changes, if Extra Hours were approved after a form was submitted, the submitted form will need to be updated to include the additional approved Extra Hours.

Click to enlarge


Extra Hours can be part of Reports. In reports, such as the Scheduled Time report, excluding a Time Type will exclude both Scheduled Time and Extra Hours with that Time Type. Once a report contains Extra Hours, if that report performs overtime calculations, the Extra Hours will be automatically included in those calculations. See Scheduled Time report example below.

Click to enlarge


For additional detail on how to set up Extra Hours, watch this video.


For questions or additional help with Extra Hours, please contact the Support Team at support@aladtec.com or 888.749.5550. As always, thank you for using Aladtec!

~ Your Aladtec Team

Adding Schedule Notes

Schedule Notes provide an easy way to share daily information with members. Schedule Notes, which can be added per Schedule per day, may be helpful to:

  • explain key details about a special event, e.g. meet at the north gate
  • remind members to complete a task, e.g. fill out rig checks at end of shift
  • give daily updates, e.g. Hwy 35 is under road construction, use Bailey Road as an alternate

Schedule Notes can be added in the Hourly Editor or Schedule Views; Monthly Calendar View is shown below. Schedule Authority is required to add or modify Schedule Notes.


Schedule Notes can be included in Shift Reminders as well, see below.


Schedule Notes are viewable by any member qualified to work on the schedule. For members with Schedule Authority, Schedule Notes can also be edited. An example of a Schedule Note in mobile is shown below.
 Image may be NSFW.
Clik here to view.


For more information on Schedule Notes, please contact the Support Team at 888.749.5550 or support@aladtec.com. As always, thank you for using Aladtec!

~Your Aladtec Team

System Log - Your Record of Events

The System Log Report is a resourceful tool for reviewing actions completed in the system. Details found in the System Log may be helpful in providing information for actions, such as:

  • Who modified a member’s schedule and when those changes were made
  • What Time-Off requests were approved or denied for a member during the last year
  • When were Signup requests submitted and approved for a specific member in the last month

Information in the System Log can be narrowed down to focus on actions occurring within a specific date range, as shown in the example below.


In addition, information in the System Log can be filtered based on actions taken by or affecting a specific member, as well as a specific time range. These filters are displayed when selecting Edit as shown below.


Applying these filters in the System Log will result in a more detailed output of information. For example, the system log below shows all actions relating to Signups for one affected member within a month.


To learn more on using the System Log, click on the video below.


If you have any questions or would like additional help with the System Log report, please contact the Support Team at 888.749.5550 or support@aladtec.com. As always, thank you for using Aladtec!

~Your Aladtec Team

Availability has an Improved Interface and Mobile Access

Aladtec released a powerful new interface to quickly add Availability for multiple dates. The mobile experience has also been updated to allow viewing and editing availability.

Members, such as part-timers and volunteers, can use Availability to communicate scheduling preferences. For instance, a part-timer may indicate which dates they are available to prevent overlaps with their personal schedule.

Similar to desktop, on any mobile device, members can now go to the My Schedule page to view and add Availability, shown below.


When adding Availability, multiple dates can be selected for a specific time range and type (available, unavailable, or prefer). In the example below, multiple dates are selected to mark as Available.


A repetition can be used when adding Availability. For example, a member may prefer to work every Monday (shown below). A repetition, custom or weekly, can be defined for a specific day, time range, and type of availability.


For more detail on viewing and adding Availability, watch this video.


For questions or additional help with Availability, please contact the Support Team at support@aladtec.com or 888.749.5550. As always, thank you for using Aladtec!

~ Your Aladtec Team

Add Shift Labels to Schedule Days

Shift Labels can be used to add a label and color to each schedule day in Aladtec. The labels and colors can be customized to provide a sense of familiarity for members, e.g. Red/Gold/Black shifts, A/B/C shifts. With Shift Labels, whether on mobile or desktop, it’s easy to quickly glance at any of the schedule views to see which shift is working and identify upcoming shifts.

In Setup, multiple Shift Labels can be added, each with a short text label and color. Every Shift Label represents 24 hours and Shift Labels can be repeated to create a rotation. In the example below, Shift Labels are repeated to create a 48/96 rotation.


Once the labels and colors are added in Setup, Shift Labels are displayed in all desktop and mobile schedule views. Shift Labels make it easy to quickly see specific shift days, such as all the Gold shift days in the Monthly Calendar below.


On mobile, while Shift Labels are automatically displayed on the Daily Summary, it is optional to include Shift Labels on My Schedule. To include Shift Labels on My Schedule, simply modify the View Options, as shown below.


For questions or additional help with Shift Labels, please contact the Support Team at support@aladtec.com or 888.749.5550. As always, thank you for using Aladtec!

~ Your Aladtec Team

Aladtec Integrates with Emergency Reporting

Aladtec can be easily integrated with Emergency Reporting (ER). With the Emergency Reporting integration, Aladtec will automatically feed schedule information to Emergency Reporting Daily Rosters, eliminating the time-consuming and error-prone task of duplicating schedule data.

After the Emergency Reporting integration is enabled, Aladtec will seamlessly create and update Emergency Reporting Daily Rosters with Aladtec scheduling information. Every fifteen minutes, Aladtec will ensure the scheduling information from yesterday, today, and tomorrow is in sync with Emergency Reporting’s daily roster information, including any changes to Aladtec schedules, such as trades, time off, and sign ups.

Enabling the Emergency Reporting integration is easy. First, contact Aladtec support (support@aladtec.com or 888.749.5550) to activate the Emergency Reporting integration. Then, create a new user in Emergency Reporting. In Aladtec - Setup - Integrations, after enabling, enter the credentials and authenticate, as shown below. 

Once the Emergency Reporting credentials are authenticated, Aladtec will automatically retrieve Emergency Reporting data, including all users, stations, apparatus, and positions. After the data is retrieved, to sync data to Emergency Reporting, match Aladtec data to Emergency Reporting data as described below.

Aladtec Members will be automatically matched to Emergency Reporting Users, if possible. For any Aladtec Member that does not match an Emergency Reporting User automatically, select the correct Emergency Reporting User from the provided list, as shown below.

Similar to matching Aladtec Members to Emergency Reporting Users, match an Aladtec Schedule to an Emergency Reporting Station - Apparatus pair. See below for an example.

Each Aladtec Position can be matched to one Emergency Reporting Position. Matching positions is optional. In the example below, Aladtec Positions have been matched to Emergency Reporting Positions.

Daily Split Time defines the time each day starts/ends in the Emergency Reporting Daily Roster. Select the Daily Split Time, an example is shown below.

After the Aladtec to Emergency Reporting matching has been completed and the Daily Split Time is selected, save the matches and start the integration, see below. Options to temporarily stop the integration or permanently disable the integration are provided as well.

For questions or additional help with the Emergency Reporting integration, please contact the Support Team at support@aladtec.com or 888.749.5550. For questions or additional help with Emergency Reporting, please reach out to Emergency Reporting. As always, thank you for using Aladtec!

~ Your Aladtec Team

Daily Staffing Requirements

Staffing requirements can now be defined for each day, using Daily Staffing Requirements. Similar to staffing requirements defined for a schedule, a warning will be displayed when the Daily Staffing Requirements are in violation. For example, Daily Staffing Requirements can be used to display a warning when the required number of full-time members is not met or when no members are scheduled with a required qualification, such as Swiftwater Rescue or HazMat.

Daily Staffing Requirements, applied across all published and unpublished schedules, can be set up:
  • down to the hours within each day of the week.
  • for the minimum number of members.
  • for multiple qualifications using member database fields, including any combination of select lists, multi-options, and expiration dates.

In the following example, Daily Staffing Requirements are set up to require at least one member with a non-expired certification for Swiftwater Rescue per day.
Image may be NSFW.
Clik here to view.


When the Daily Staffing Requirement for Swiftwater Rescue is violated, a warning and the details of the violation are available in the Work Schedule views, shown in the Monthly Calendar view below.
Image may be NSFW.
Clik here to view.


The Hourly Editor also includes a warning for the Daily Staffing Requirements violation. In this example, the violation details indicate one member is needed to fulfill the Daily Staffing Requirement for Swiftwater Rescue.
Image may be NSFW.
Clik here to view.


The Daily Staffing Requirement warning is visible to all members on My Schedule. Members can also view the violation details for consideration when signing up for shifts.


To learn more on using Daily Staffing Requirements, click on the video below.


For questions or additional help with Daily Staffing Requirements, please contact the Support Team
at support@aladtec.com or 888.749.5550. As always, thank you for using Aladtec!

~ Your Aladtec Team

Aladtec Integrates with FIREHOUSE Software by ESO

Aladtec can be easily integrated with FIREHOUSE Software by ESO. With the FIREHOUSE Software integration, Aladtec will automatically feed schedule information to the FIREHOUSE Software roster, eliminating the time-consuming and error-prone task of duplicating schedule data.

After the FIREHOUSE Software integration is enabled, every fifteen minutes, Aladtec will ensure the members currently working are in sync with FIREHOUSE Software’s roster, including any changes to Aladtec schedules resulting from trades, time off, and sign ups.

Prior to setting up the FIREHOUSE Software integration, confirm Aladtec Shift Labels match FIREHOUSE Software Shift Codes. See example of Aladtec Shift Labels below.


Enabling the FIREHOUSE Software integration is easy. First, contact Aladtec support (support@aladtec.com or 888.749.5550) to activate the FIREHOUSE Software integration. Then, reach out to ESO to set up the FIREHOUSE Software import and request account information, including user name, password, and FTP host.

In Aladtec - Setup - Integrations, after enabling, enter the account information and authenticate, as shown below.


Once the FIREHOUSE Software account information is authenticated, FIREHOUSE Software data can be entered to match to Aladtec data, as described below.

Aladtec Members will be automatically listed, simply enter the corresponding FIREHOUSE Software Staff ID for each Aladtec Member, as displayed in the example below.


Similar to matching Aladtec Members to FIREHOUSE Software Staff IDs, for each Aladtec Schedule listed, a FIREHOUSE Software Station ID and Unit ID can be entered. See below for an example.


Daily Split Time defines the time each day the roster starts/ends. Select the Daily Split Time, as shown in the example below.


After the Aladtec to FIREHOUSE Software matching has been completed and the Daily Split Time is selected, save the matches and start the integration, see below. Options to temporarily stop the integration or permanently disable the integration are provided as well.


For questions or additional help with the FIREHOUSE Software integration, please contact the Support Team at support@aladtec.com or 888.749.5550. For questions or additional help with FIREHOUSE Software by ESO, please reach out to ESO. As always, thank you for using Aladtec!

~ Your Aladtec Team

Assigning Time Off Accrual to Members

Aladtec has enhanced the Time Off Accrual feature, offering greater flexibility in defining accruals for members. The enhancement allows members to seamlessly roll from one accrual profile to another, eliminating the need to assign new accrual profiles over time. Also, members can now start accruing on a date in the past, simplifying set up for the initial accrual period.

To implement Time Off Accruals, in Setup, enable Time Off, then define accrual profiles. In the example below, accrual profiles have been defined based on job and years of experience. Each accrual profile can be set up to automatically accrue hours per Time Off Type.

Once Accrual Profiles are defined, multiple Accrual Profiles can be assigned to each member, as shown in the example below. Each Accrual Profile is only effective during the specified Profile Date Range. A member is eligible to begin accruing hours on the Starts Accruing date, which can be set to a date in the past. Automatic accruals will be deposited after hours have been accrued, providing the deposit date is within the Profile Date Range.


Each Accrual Profile assigned to a member includes, per accrual type, the Next Deposit date and the Accrual Rate, making it easy to confirm the member’s time off accrual was set up correctly.


For additional information on how to use Time Off Accrual, watch this video.


For questions or additional help with Time Off Accrual, please contact the Support Team at support@aladtec.com or 888.749.5550. As always, thank you for using Aladtec!

~ Your Aladtec Team

Aladtec Integrates with ImageTrend

Aladtec can be easily integrated with ImageTrend. With the ImageTrend integration, Aladtec will automatically feed schedule information to ImageTrend Daily Rosters, eliminating the time-consuming and error-prone task of duplicating schedule data.

After the ImageTrend integration is enabled, Aladtec will seamlessly create and update ImageTrend Daily Rosters with Aladtec scheduling information. Every fifteen minutes, Aladtec will ensure the scheduling information from yesterday, today, and tomorrow is in sync with ImageTrend’s daily roster information, including any changes to Aladtec schedules resulting from trades, time off, and sign ups.

Enabling the ImageTrend integration is easy. First, contact Aladtec support (support@aladtec.com or 888.749.5550) to activate the ImageTrend integration. Then, request account information from ImageTrend, including an API Token and URL. In Aladtec - Setup - Integrations, after enabling, enter the account information and authenticate, as shown below.
Image may be NSFW.
Clik here to view.


Once the ImageTrend account information is authenticated, ImageTrend data can be matched to Aladtec data, as described below.

Aladtec Members will be automatically listed. The ImageTrend Personnel ID matching each Aladtec Member can be entered.
Image may be NSFW.
Clik here to view.


Similar to entering in ImageTrend Personnel IDs, for each Aladtec Schedule listed, an ImageTrend Apparatus ID and Agency Location ID can be entered. See below for an example.
Image may be NSFW.
Clik here to view.


Additionally, for each Aladtec Position, an ImageTrend Role Code can be entered, as shown below.
Image may be NSFW.
Clik here to view.


Each Aladtec Shift Label can have an ImageTrend Shift Name entered, see example below.
Image may be NSFW.
Clik here to view.


Daily Split Time defines the time each day starts/ends in the ImageTrend Daily Roster. Select the Daily Split Time, example shown below.
Image may be NSFW.
Clik here to view.


After the Aladtec to ImageTrend matching has been completed and the Daily Split Time is selected, save the matches and start the integration, see below. Options to temporarily stop the integration or permanently disable the integration are provided as well.
Image may be NSFW.
Clik here to view.


For questions or additional help with the ImageTrend integration, please contact the Support Team at support@aladtec.com or 888.749.5550. For questions or additional help with ImageTrend, please reach out to ImageTrend. As always, thank you for using Aladtec!

~ Your Aladtec Team

Share Filters with Other Members

Top Level Administrators can easily share filters with other members. Sharing filters, such as work schedule, member, and report filters, not only eliminates the need for multiple members to create the same filter, it helps ensure members are all looking at the same information. A few examples of when it may be important to see the same information include:

  • determining overtime hours in reports or the hourly editor
  • ensuring members see the same set of open shifts in a schedule view
  • reviewing submitted forms, such as timesheets and maintenance requests

When creating a new filter, Top Level Administrators can choose to share the filter with other members, as shown below.


Once the filter is shared, any member who can view the selected information will have the new filter automatically included in Shared Filters, see below.


Shared Filters can be updated or deleted by any Top Level Administrator. As shown below, simply Edit the shared filter, then Save or Delete. If the shared filter is saved, all members will automatically have the shared filter updated.


For additional information on how to share filters, watch this video.


For questions or additional help with Shared Filters, please contact the Support Team at support@aladtec.com or 888.749.5550. As always, thank you for using Aladtec!

~ Your Aladtec Team

Publish Per Schedule


We recently made a change to our Schedule Publishing feature in Aladtec’s online employee scheduling and workforce management system. A powerful modification has been added to the publishing feature allowing each Schedule to be published individually.

With this modification, administrators will now be able to “hide” individual schedules. This will allow administrators to work on future schedules without the members being able to see any changes before they are ready to be published. This modification also allows those systems with multiple departments to set their own publishing rules, instead of adhering to one.

In the following example, in Schedules under Setup, only the Rocky Road Station schedule will publish the next month’s schedule automatically on the 20th of the Current Month at 12:00 a.m.. Other options for publishing schedules include: Manual and Custom.

Image may be NSFW.
Clik here to view.


Throughout the system, you’ll easily be able to see which schedules are unpublished.

On the Hourly Editor, each unpublished schedule will have an ‘unpublished’ indicator displayed next to the date of the unpublished schedule.

Image may be NSFW.
Clik here to view.


On all of the Work Schedule Views, the same ‘unpublished’ indicator is used to indicate unpublished schedules. You’ll typically see this notation near the schedule name, or date. Some pages also have an additional indicator that there are unpublished schedules at the top or bottom of the page.

Image may be NSFW.
Clik here to view.


For additional detail on the enhancement to the Publish Per Schedule feature, please watch the video here.


If you have questions, or need assistance with the Publish Per Schedule feature, please contact your Technical Support Team at support@aladtec.com or 888.749.5550. As always, thank you for choosing Aladtec.

Aladtec Integrates with emsCharts


Aladtec can be easily integrated with emsCharts. With the integration, Aladtec will automatically feed schedule information to emsCharts, eliminating the time-consuming and error-prone task of adding crew members twice. Using the crew member information fed, emsCharts will automatically fill in crew members on any newly created charts.

After the emsCharts integration is enabled, Aladtec will seamlessly send scheduling information to emsCharts. Every fifteen minutes, Aladtec will ensure the scheduling information from yesterday, today, and tomorrow is in sync with emsCharts’s crew information. Aladtec schedule changes may result from trades, time off, and sign ups.

Enabling the emsCharts integration is easy. First, contact Aladtec (integrations@aladtec.com or 888.749.5550) to activate the emsCharts integration. Then, request account information from emsCharts, including a username and password. In Aladtec - Setup - Integrations, after enabling, enter the account information and authenticate, as shown below.
Image may be NSFW.
Clik here to view.


Once the emsCharts account information is authenticated, emsCharts data can be matched to Aladtec data, as described below.

Aladtec Members will be automatically listed. The emsCharts Personnel ID matching each Aladtec Member can be entered.
Image may be NSFW.
Clik here to view.


Similar to entering in emsCharts Personnel IDs, for each Aladtec Schedule listed, an emsCharts Unit ID and Basesite ID can be entered. Multiple emsCharts Unit IDs can be entered if members on one Aladtec schedule need to be fed to multiple emsCharts Units. See below for an example.
Image may be NSFW.
Clik here to view.


Each Aladtec Shift Label can have an emsCharts Shift ID entered, see the example below.
Image may be NSFW.
Clik here to view.


Daily Split Time defines the time each day starts/ends and can be selected, as shown in the example below.
Image may be NSFW.
Clik here to view.


After the Aladtec to emsCharts matching has been completed and the Daily Split Time is selected, save the matches and start the integration, see below. Options to temporarily stop the integration or permanently disable the integration are provided as well.
Image may be NSFW.
Clik here to view.


For questions or additional help with the emsCharts integration, please contact the Support Team at support@aladtec.com or 888.749.5550. For questions or additional help with emsCharts, please reach out to emsCharts. As always, thank you for using Aladtec!

~ Your Aladtec Team

Forgotten password? We've got you covered!


Aladtec engineers have simplified the process for members who've forgotten a password.

Previously, the user would have to enter all e-mail addresses he or she registered in the system. Now they need only enter one, and the reset message will be sent to that address.

Aladtec named to Inc. 5000 for fifth year


Loyalty shown by Aladtec customers and a willingness by many to share word-of-mouth referrals to neighboring agencies helped Aladtec earn a fifth year on Inc. magazine's "5000" list -- a ranking of the nation's fastest-growing private companies.

Inc. magazine released its 38th annual Inc. 5000 list in mid-August. Aladtec, Inc. moved 169 spots, shifting from No. 3099 last year to No. 3268 this year.

Aladtec recorded 128 percent growth over the last three years.

"It’s an honor to achieve the Inc 5000 list for the fifth year in a row,” said Aladtec’s founder and president David Feyereisen. “We try to provide public safety and healthcare organizations with a world-class workforce management solution at a price any department can afford. Our staff is dedicated to that goal. We owe our continued growth to their hard work and the strong word-of-mouth endorsements of our amazing customers.”
Viewing all 206 articles
Browse latest View live